NGINX Plus の動作
1. NGINX Plusのインストール (15min)
Note
手順確認の目的で、NGINX Plusの他、NGINX App Protect WAF、NGINX App Protect Dosのインストール手順も示しています。 ただし、本ラボでセキュリティ機能の確認はありません
1. NGINX Licenseファイルのコピー
Note
取得したライセンスファイルをJump Hostにコピーした後、ubuntu-01に送信するためにpscpをご利用いただくことが可能です。以下コマンドを参考にご利用ください。コマンドプロンプト、powershellなどのターミナルから実行いただけます
なお、ubuntu01/02およびdocker_hostにライセンスファイルを格納しております。格納位置は以下になります
Windows2019_JumpBox、vnc-windows:C:\Users\user\Desktop\Key
Ubuntu01/02:/home/ubuntu/
docker_host:/home/centos/
コマンド: pscp -i <SSHで利用する公開鍵> <送付するファイル> <宛先>

pscp -i .\.ssh\id_rsa-putty.ppk <送信するファイル> ubuntu@10.1.1.7:/home/ubuntu
sudo mkdir -p /etc/ssl/nginx
sudo cp ~/nginx-repo.crt /etc/ssl/nginx/
sudo cp ~/nginx-repo.key /etc/ssl/nginx/
2. コマンドの実行
NGINX、App Protect WAF と App Protect DoS のリポジトリに利用する鍵を取得します
sudo wget -qO - https://cs.nginx.com/static/keys/nginx_signing.key | sudo gpg --dearmor | sudo tee /usr/share/keyrings/nginx-archive-keyring.gpg >/dev/null

sudo wget -qO - https://cs.nginx.com/static/keys/app-protect-security-updates.key | sudo gpg --dearmor | sudo tee /usr/share/keyrings/app-protect-security-updates.gpg >/dev/null
必要となるパッケージをインストールします
sudo apt-get update

sudo apt-get install apt-transport-https lsb-release ca-certificates wget gnupg2 ubuntu-keyring
レポジトリの情報を追加します
# NGINX Plusのレポジトリ情報
printf "deb [signed-by=/usr/share/keyrings/nginx-archive-keyring.gpg] https://pkgs.nginx.com/plus/R32/ubuntu `lsb_release -cs` nginx-plus\n" | sudo tee /etc/apt/sources.list.d/nginx-plus.list

# NGINX App Protectのレポジトリ情報
printf "deb [signed-by=/usr/share/keyrings/nginx-archive-keyring.gpg] https://pkgs.nginx.com/app-protect/R32/ubuntu `lsb_release -cs` nginx-plus\n" | sudo tee /etc/apt/sources.list.d/nginx-app-protect.list

printf "deb [signed-by=/usr/share/keyrings/app-protect-security-updates.gpg] https://pkgs.nginx.com/app-protect-security-updates/ubuntu `lsb_release -cs` nginx-plus\n" | sudo tee -a /etc/apt/sources.list.d/nginx-app-protect.list

# NGINX App Protect DoSのレポジトリ情報
printf "deb [signed-by=/usr/share/keyrings/nginx-archive-keyring.gpg] https://pkgs.nginx.com/app-protect-dos/R32/ubuntu `lsb_release -cs` nginx-plus\n" | sudo tee /etc/apt/sources.list.d/nginx-app-protect-dos.list
aptコマンドの設定情報を取得します
sudo wget -P /etc/apt/apt.conf.d https://cs.nginx.com/static/files/90pkgs-nginx
パッケージ情報を更新します
sudo apt-get update
3. NGINX パッケージのインストール
sudo apt-get install -y nginx-plus
sudo apt-get install -y app-protect app-protect-attack-signatures
sudo apt-get install -y app-protect-dos
# NAP DoS Release 4.4 より
sudo apt-get install -y app-protect-dos-ebpf
インストールしたパッケージの情報の確認します
nginx -v
1nginx version: nginx/1.25.5 (nginx-plus-r32-p1)
-V (大文字) を指定することによりパッケージが利用するOpenSSLの情報や、configureのオプションを確認できます。
nginx -V
1nginx version: nginx/1.25.5 (nginx-plus-r32-p1)
2built by gcc 9.4.0 (Ubuntu 9.4.0-1ubuntu1~20.04.2)
3built with OpenSSL 1.1.1f  31 Mar 2020
4TLS SNI support enabled
5configure arguments: --prefix=/etc/nginx --sbin-path=/usr/sbin/nginx --modules-path=/usr/lib/nginx/modules --conf-path=/etc/nginx/nginx.conf --error-log path=/var/log/nginx/error.log --http-log-path=/var/log/nginx/access.log --pid-path=/var/run/nginx.pid --lock-path=/var/run/nginx.lock --http-client-body-temp-path=/var/cache/nginx/client_temp --http-proxy-temp-path=/var/cache/nginx/proxy_temp --http-fastcgi-temp-path=/var/cache/nginx/fastcgi_temp --http-uwsgi-temp-path=/var/cache/nginx/uwsgi_temp --http-scgi-temp-path=/var/cache/nginx/scgi_temp --user=nginx --group=nginx --with-compat --with-file-aio --with-threads --with-http_addition_module --with-http_auth_request_module --with-http_dav_module --with-http_flv_module --with-http_gunzip_module --with-http_gzip_static_module --with-http_mp4_module --with-http_random_index_module --with-http_realip_module --with-http_secure_link_module --with-http_slice_module --with-http_ssl_module --with-http_stub_status_module --with-http_sub_module --with-http_v2_module --with-http_v3_module --with-mail --with-mail_ssl_module --with-stream --with-stream_realip_module --with-stream_ssl_module --with-stream_ssl_preread_module --build=nginx-plus-r32-p1 --mgmt-id-path=/var/lib/nginx/nginx.id --with-http_auth_jwt_module --with-http_f4f_module --with-http_hls_module --with-http_proxy_protocol_vendor_module --with-http_session_log_module --with-mgmt --with-stream_mqtt_filter_module --with-stream_mqtt_preread_module --with-stream_proxy_protocol_vendor_module --with-cc-opt='-g -O2 -fdebug-prefix-map=/data/builder/debuild/nginx-plus-1.25.5/debian/debuild-base/nginx-plus-1.25.5=. -fstack-protector-strong -Wformat -Werror=format-security -Wp,-D_FORTIFY_SOURCE=2 -fPIC' --with-ld-opt='-Wl,-Bsymbolic-functions -Wl,-z,relro -Wl,-z,now -Wl,--as-needed -pie'
またUbuntuの環境では以下サンプルのようにパッケージの詳細を確認することが可能です。
 1# sudo apt show nginx-plus
 2Package: nginx-plus
 3Version: 32-2~focal
 4Priority: optional
 5Section: httpd
 6Maintainer: NGINX Packaging <nginx-packaging@f5.com>
 7Installed-Size: 7296 kB
 8Provides: httpd, nginx, nginx-plus-r32
 9Depends: libc6 (>= 2.28), libcrypt1 (>= 1:4.1.0), libpcre2-8-0 (>= 10.22), libssl1.1 (>= 1.1.1), zlib1g (>= 1:1.1.4), lsb-base (>= 3.0-6)
10Recommends: logrotate
11Conflicts: nginx, nginx-common, nginx-core
12Replaces: nginx, nginx-core, nginx-plus-debug
13Homepage: https://www.nginx.com/
14Download-Size: 3567 kB
15APT-Manual-Installed: yes
16APT-Sources: https://pkgs.nginx.com/plus/R32/ubuntu focal/nginx-plus amd64 Packages
17Description: NGINX Plus, provided by Nginx, Inc.
18 NGINX Plus extends NGINX open source to create an enterprise-grade
19 Application Delivery Controller, Accelerator and Web Server. Enhanced
20 features include: Layer 4 and Layer 7 load balancing with health checks,
21 session persistence and on-the-fly configuration; Improved content caching;
22 Enhanced status and monitoring information; Streaming media delivery.
2~3,8行目: 指定したNGINX Plusのパッケージであることが確認できます6行目: MaintainerとしてF5の情報が確認できます
NGINX App Protect のVersion
cat /opt/app_protect/VERSION
NGINX App Protect DoS のVersion
admd -v
その他インストールしたパッケージの情報を確認いただけます。ラボ環境のホストはUbuntuとなります。
1 # dpkg-query -l | grep nginx-plus
2 ii  nginx-plus                         32-2~focal                            amd64        NGINX Plus, provided by Nginx, Inc.
3 ii  nginx-plus-module-appprotect       32+5.144.0-1~focal                    amd64        NGINX Plus app protect dynamic module version 5.144.0
4 ii  nginx-plus-module-appprotectdos    32+4.4.1-1~focal                      amd64        NGINX Plus appprotectdos dynamic module
 1 # dpkg-query -l | grep app-protect
 2 ii  app-protect-attack-signatures      2024.11.13-1~focal                    amd64        Attack Signature Updates for App-Protect
 3 ii  app-protect-bot-signatures         2024.11.18-1~focal                    amd64        Bot Signature Updates for App-Protect
 4 ii  app-protect-common                 11.133.0-1~focal                      amd64        NGINX App Protect
 5 ii  app-protect-compiler               11.133.0-1~focal                      amd64        Control-plane(aka CP) for waf-general debian
 6 ii  app-protect-dos                    32+4.4.1-1~focal                      amd64        Nginx DoS protection
 7 ii  app-protect-dos-ebpf               32+4.4.1-1~focal                      amd64        Nginx DoS protection
 8 ii  app-protect-engine                 11.133.0-1~focal                      amd64        NGINX App Protect
 9 ii  app-protect-geoip                  2023.10.30-1~focal                    amd64        App Protect GeoIP
10 ii  app-protect-graphql                0.7.0-1~focal                         amd64        App Protect GraphQL Parsing Library
11 ii  app-protect-plugin                 6.3.0-1~focal                         amd64        NGINX App Protect plugin
12 ii  app-protect-threat-campaigns       2024.11.19-1~focal                    amd64        Threat Campaign Updates for App-Protect
2. NGINXの基礎
1. ステータスの確認 (5min)
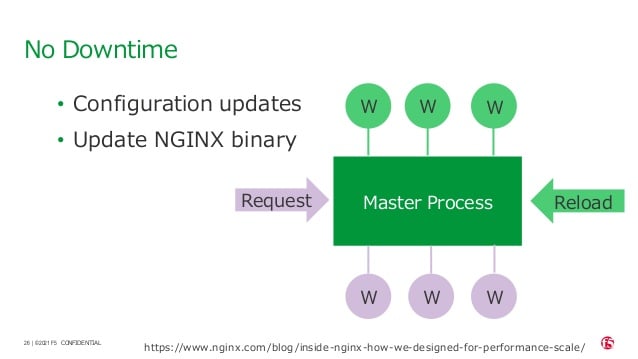
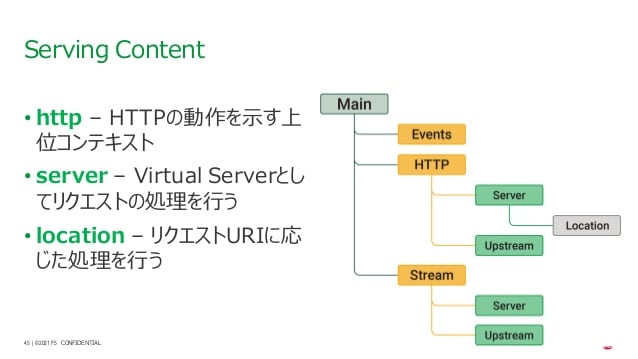
NGINX Plusのアーキテクチャ

NGINX の停止・起動
sudo service nginx stop
sudo service nginx start
NGINX のstatusを確認します
sudo service nginx status
 1 ● nginx.service - NGINX Plus - high performance web server
 2      Loaded: loaded (/lib/systemd/system/nginx.service; enabled; vendor preset: enabled)
 3      Active: active (running) since Mon 2021-11-22 10:12:55 UTC; 11s ago
 4        Docs: https://www.nginx.com/resources/
 5     Process: 9126 ExecStartPre=/usr/lib/nginx-plus/check-subscription (code=exited, status=0/SUCCESS)
 6     Process: 9146 ExecStart=/usr/sbin/nginx -c /etc/nginx/nginx.conf (code=exited, status=0/SUCCESS)
 7    Main PID: 9147 (nginx)
 8       Tasks: 3 (limit: 2327)
 9      Memory: 2.6M
10      CGroup: /system.slice/nginx.service
11              ├─9147 nginx: master process /usr/sbin/nginx -c /etc/nginx/nginx.conf
12              ├─9148 nginx: worker process
13              └─9149 nginx: worker process
14
15 Nov 22 10:12:55 ip-10-1-1-7 systemd[1]: Starting NGINX Plus - high performance web server...
16 Nov 22 10:12:55 ip-10-1-1-7 systemd[1]: nginx.service: Can't open PID file /run/nginx.pid (yet?) after start: Operation not permitted
17 Nov 22 10:12:55 ip-10-1-1-7 systemd[1]: Started NGINX Plus - high performance web server.
pidファイルの配置場所の確認します
grep pid /etc/nginx/nginx.conf
1 pid /var/run/nginx.pid;
pidの内容を確認します
cat /var/run/nginx.pid
1 9147
論理コア数を確認します
grep processor /proc/cpuinfo | wc -l
1 2
NGINX Processを確認します
NGINXはMaster Processと通信制御を行うWorker Processに分かます。Worker ProcessはCPUCore数の数起動し、並列処理を行う設定となっている。 Master ProcessのPIDがPIDファイルに記載されている内容と一致していることを確認する また、Worker ProcessがCPU Core数の数だけ起動していることを確認します
ps aux | grep nginx
1 nginx       9122  0.0  0.0   2616   608 ?        Ss   10:12   0:00 /bin/sh -c usr/share/ts/bin/bd-socket-plugin tmm_count 4 proc_cpuinfo_cpu_mhz 2000000 total_xml_memory 307200000 total_umu_max_size 3129344 sys_max_account_id 1024 no_static_config 2>&1 >> /var/log/app_protect/bd-socket-plugin.log
2 nginx       9123  0.3  3.0 385260 61592 ?        Sl   10:12   0:00 usr/share/ts/bin/bd-socket-plugin tmm_count 4 proc_cpuinfo_cpu_mhz 2000000 total_xml_memory 307200000 total_umu_max_size 3129344 sys_max_account_id 1024 no_static_config
3 nginx       9125  0.0  0.0   2616   608 ?        Ss   10:12   0:00 /bin/sh -c /usr/bin/admd -d --log info 2>&1 > /var/log/adm/admd.log
4 nginx       9127  0.5  2.5 799208 50732 ?        Sl   10:12   0:00 /usr/bin/admd -d --log info
5 root        9147  0.0  0.0   9136   892 ?        Ss   10:12   0:00 nginx: master process /usr/sbin/nginx -c /etc/nginx/nginx.conf
6 nginx       9148  0.0  0.1   9764  3528 ?        S    10:12   0:00 nginx: worker process
7 nginx       9149  0.0  0.1   9764  3528 ?        S    10:12   0:00 nginx: worker process
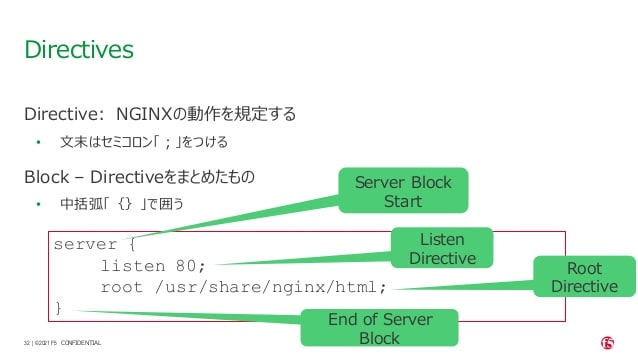
2. Directive / Block (5min)
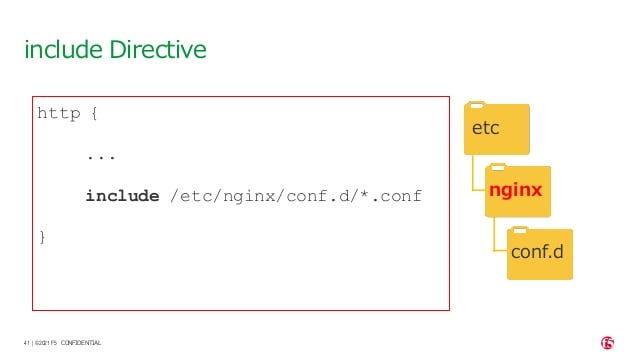
3. Configの階層構造 (5min)

3. 基本的な動作の確認
1. 事前ファイルの取得 (5min)
ラボで必要なファイルをGitHubから取得します
sudo su -
cd ~/
git clone https://github.com/BeF5/f5j-nginx-plus-lab1-conf.git
2. 設定のテスト、設定の反映 (10min)
ディレクトリを移動し、必要なファイルをコピーします
cp ~/f5j-nginx-plus-lab1-conf/lab/incomplete.conf /etc/nginx/conf.d/default.conf
設定ファイルの内容を確認します
cat ~/f5j-nginx-plus-lab1-conf/lab/incomplete.conf
1 server {
2     # you need to add ; at end of listen directive.
3     listen       81
4     server_name  localhost;
5     location / {
6         root   /usr/share/nginx/html;
7         index  index.html index.htm;
8     }
9 }
基本的なコマンドと、Signalについて以下を確認してください。
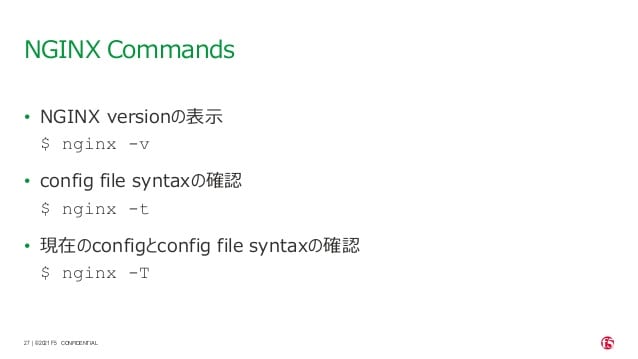
-t と -T の2つのオプションを実行し、違いを確認します。まず、オプションの内容を確認してください。
1 # nginx -h
2 nginx version: nginx/1.21.3 (nginx-plus-r25)
3 Usage: nginx [-?hvVtTq] [-s signal] [-p prefix]
4 [-e filename] [-c filename] [-g directives]
5
6 Options:
7 -?,-h : this help
8 -v : show version and exit
9 -V : show version and configure options then exit
10 -t : test configuration and exit
11 -T : test configuration, dump it and exit
12 -q : suppress non-error messages during configuration testing
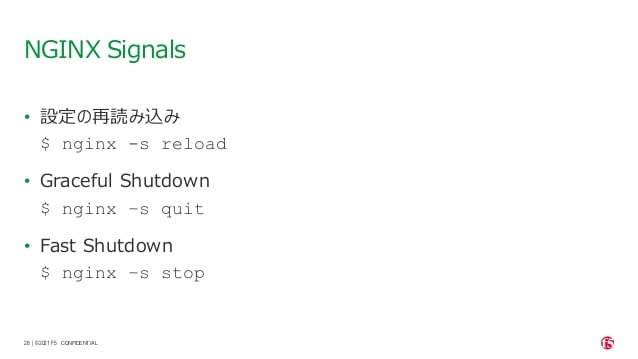
13 -s signal : send signal to a master process: stop, quit, reopen, reload
14 -p prefix : set prefix path (default: /etc/nginx/)
15 -e filename : set error log file (default: /var/log/nginx/error.log)
16 -c filename : set configuration file (default: /etc/nginx/nginx.conf)
17 -g directives : set global directives out of configuration file
テストを実行します(-t)
nginx -t
1 nginx: [emerg] invalid parameter "server_name" in /etc/nginx/conf.d/default.conf:4
2 nginx: configuration file /etc/nginx/nginx.conf test failed
vi /etc/nginx/conf.d/default.conf
1 listen directiveの文末に ; を追加してください。
2 ---
3 [変更前]    listen       81
4 [変更後]    listen       81;
5 ---
-t の実行nginx -t
1 nginx: the configuration file /etc/nginx/nginx.conf syntax is ok
2 nginx: configuration file /etc/nginx/nginx.conf test is successful
-T の実行
nginx -T
 1 nginx: the configuration file /etc/nginx/nginx.conf syntax is ok
 2 nginx: configuration file /etc/nginx/nginx.conf test is successful
 3 # configuration file /etc/nginx/nginx.conf:
 4
 5 user  nginx;
 6 worker_processes  auto;
 7
 8 error_log  /var/log/nginx/error.log notice;
 9 pid        /var/run/nginx.pid;
10
11
12 events {
13     worker_connections  1024;
14 }
15
16
17 http {
18     include       /etc/nginx/mime.types;
19     default_type  application/octet-stream;
20
21     log_format  main  '$remote_addr - $remote_user [$time_local] "$request" '
22                       '$status $body_bytes_sent "$http_referer" '
23                       '"$http_user_agent" "$http_x_forwarded_for"';
24
25     access_log  /var/log/nginx/access.log  main;
26
27     sendfile        on;
28     #tcp_nopush     on;
29
30     keepalive_timeout  65;
31
32     #gzip  on;
33
34     include /etc/nginx/conf.d/*.conf;
35 }
36
37
38 ※省略※
39 # configuration file /etc/nginx/conf.d/default.conf:
40 server {
41     # you need to add ; at end of listen directive.
42     listen       81;
43     server_name  localhost;
44     location / {
45         root   /usr/share/nginx/html;
46         index  index.html index.htm;
47     }
48 }
nginx -s reload
ss -anp | grep nginx | grep LISTEN
1 tcp LISTEN 0 511 0.0.0.0:81 0.0.0.0:* users:(("nginx",pid=9341,fd=12),("nginx",pid=9340,fd=12),("nginx",pid=9147,fd=12))
curlコマンドを実行します
curl -s localhost:81 | grep title
1 <title>Welcome to nginx!</title>
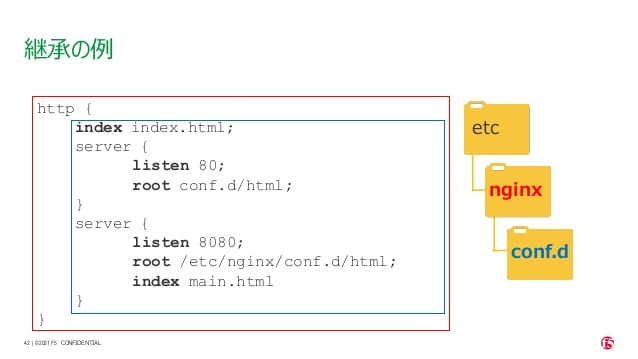
3. 設定の継承 (10min)
ラボで使用するファイルをコピーします
cp -r ~/f5j-nginx-plus-lab1-conf/html /etc/nginx/conf.d
cp ~/f5j-nginx-plus-lab1-conf/lab/inheritance.conf /etc/nginx/conf.d/default.conf
listen 80では、indexを個別に記述をしていません。 listen 8080では、 indexとして main.html を指定しています。 また、それぞれ root の記述方法が異なっています。
cat ~/f5j-nginx-plus-lab1-conf/lab/inheritance.conf
 1 index index.html;
 2 server {
 3         listen 80;
 4         root conf.d/html;
 5 }
 6 server {
 7         listen 8080;
 8         root /etc/nginx/conf.d/html;
 9         index main.html;
10 }
設定を反映し、これらがどのように動作するのか見てみましょう
nginx -s reload
ss -anp | grep nginx | grep LISTEN
1 tcp    LISTEN  0       511                                              0.0.0.0:8080                                              0.0.0.0:*                      users:(("nginx",pid=9392,fd=9),("nginx",pid=9391,fd=9),("nginx",pid=9147,fd=9))
2 tcp    LISTEN  0       511                                              0.0.0.0:80                                                0.0.0.0:*                      users:(("nginx",pid=9392,fd=8),("nginx",pid=9391,fd=8),("nginx",pid=9147,fd=8))
Port 80 に対し、curlコマンドを実行します
curl -s localhost:80 | grep path
1 <h2>path: html/index.html</h2>
Port 8080 に対し、curlコマンドを実行します
curl -s localhost:8080 | grep path
1 <h2>path: html/main.html</h2>
4. server directive (10min)
NGINXが通信を待ち受ける動作について以下を確認してください
ラボで使用するファイルをコピーします
cp ~/f5j-nginx-plus-lab1-conf/lab/blank-defaultbehavior.conf /etc/nginx/conf.d/default.conf
設定内容を確認します
cat ~/f5j-nginx-plus-lab1-conf/lab/blank-defaultbehavior.conf
1 server {
2
3 }
設定を反映します
nginx -s reload
ss -anp | grep nginx | grep LISTEN
1 tcp LISTEN 0 511 0.0.0.0:80 0.0.0.0:* users:(("nginx",pid=9445,fd=8),("nginx",pid=9444,fd=8),("nginx",pid=9147,fd=8))
curl localhost:80
1 <html>
2 <head><title>404 Not Found</title></head>
3 <body>
4 <center><h1>404 Not Found</h1></center>
5 <hr><center>nginx/1.21.3</center>
6 </body>
これらの内容より、server directiveに設定を記述しない場合にも、defaultのパラメータで動作していることが確認できます。
それでは対象となるディレクトリにファイルをコピーします
mkdir /etc/nginx/html
cp /etc/nginx/conf.d/html/default-path_index.html /etc/nginx/html/index.html
curl -s localhost:80 | grep default
1 <h2>This is default html file path</h2>
今度は正しく結果が表示されました。 このようにdefaultパラメータの動作を確認できました
5. listen directive (10min)
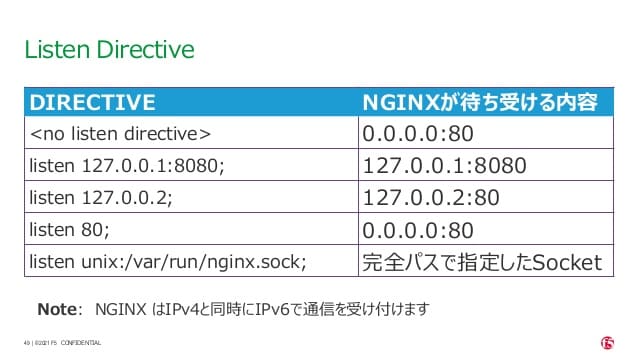
ラボで使用するファイルをコピーします
cp ~/f5j-nginx-plus-lab1-conf/lab/multi-listen.conf /etc/nginx/conf.d/default.conf
設定内容を確認し、反映します
cat ~/f5j-nginx-plus-lab1-conf/lab/multi-listen.conf
 1 # server {
 2 #    ## no listen directive
 3 # }
 4
 5 server {
 6     listen 127.0.0.1:8080;
 7 }
 8
 9 server {
10     listen 127.0.0.2;
11 }
12
13 server {
14     listen 8081;
15 }
16
17 server {
18     listen unix:/var/run/nginx.sock;
19 }
設定を反映します
service nginx restart
ソケットが生成されていることを確認します
ls /var/run/nginx.sock
1 /var/run/nginx.sock
NGINXでListenしている内容を確認します
ss -anp | grep nginx | grep LISTEN
1 u_str LISTEN    0      511                                  /var/run/nginx.sock 60394                                                   * 0                      users:(("nginx",pid=9947,fd=9),("nginx",pid=9946,fd=9),("nginx",pid=9945,fd=9))
2 tcp   LISTEN    0      511                                            127.0.0.2:80                                                0.0.0.0:*                      users:(("nginx",pid=9947,fd=7),("nginx",pid=9946,fd=7),("nginx",pid=9945,fd=7))
3 tcp   LISTEN    0      511                                            127.0.0.1:8080                                              0.0.0.0:*                      users:(("nginx",pid=9947,fd=6),("nginx",pid=9946,fd=6),("nginx",pid=9945,fd=6))
4 tcp   LISTEN    0      511                                              0.0.0.0:8081                                              0.0.0.0:*                      users:(("nginx",pid=9947,fd=8),("nginx",pid=9946,fd=8),("nginx",pid=9945,fd=8))
それぞれ Listen している内容に対して接続できることを確認してください
curl -s 127.0.0.1:8080 | grep default
1 <h2>This is default html file path</h2>
curl -s 127.0.0.2:80 | grep default
1 <h2>This is default html file path</h2>
curl -s 127.0.0.1:8081 | grep default
1 <h2>This is default html file path</h2>
curl -s --unix-socket /var/run/nginx.sock http: | grep default
1 <h2>This is default html file path</h2>
socketを削除し、NGINXが起動することを確認します
rm /var/run/nginx.sock
rm /etc/nginx/conf.d/default.conf
service nginx restart
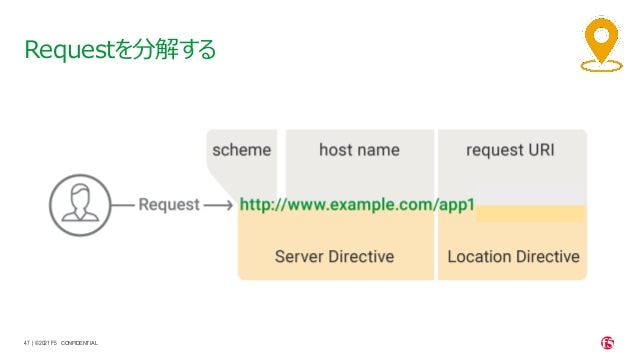
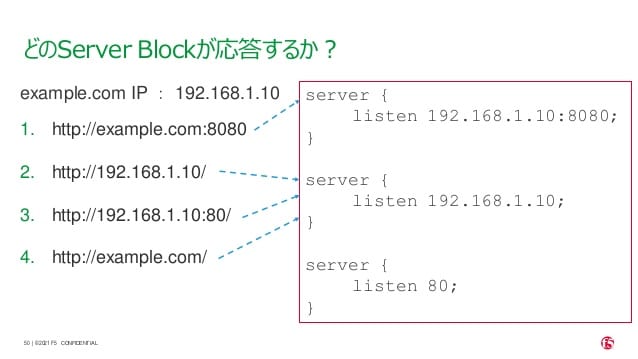
6. server_name directive (10min)
server_name directiveを利用することにより、待ち受けるFQDNを指定することが可能です。
ラボで使用するファイルをコピーします
cp ~/f5j-nginx-plus-lab1-conf/lab/multi-server_name.conf /etc/nginx/conf.d/default.conf
設定内容を確認し、反映します
cat ~/f5j-nginx-plus-lab1-conf/lab/multi-server_name.conf
実行結果を確認します
 1 server {
 2     server_name example.com;
 3     return 200 "example.com\n";
 4 }
 5
 6 server {
 7     server_name host1.example.com;
 8     return 200 "host1.example.com\n";
 9 }
10
11 server {
12         server_name www.example.*;
13     return 200 "www.example.*\n";
14 }
15 server{
16         server_name *.org;
17     return 200 "*.org\n";
18 }
19 server {
20         server_name *.example.org;
21     return 200 "*.example.org\n";
22 }
23
24 server {
25         listen 80;
26         server_name ~^(www2|host2).*\.example\.com$;
27    return 200 "~^(www2|host2).*\.example\.com\n";
28 }
29 server {
30         listen 80;
31         server_name ~^.*\.example\..*$;
32     return 200 "~^.*\.example\..*\n";
33 }
34 server {
35         listen 80;
36         server_name ~^(host2|host3).*\.example\.com$;
37     return 200 "~^(host2|host3).*\.example\.com\n";
38 }
設定を反映します
nginx -s reload
server_nameの処理順序は以下です

以下のコマンドを実行し結果を確認します。 どのような処理が行われているか確認してください
完全一致する結果を確認します
curl localhost -H 'Host:host1.example.com'
1 host1.example.com
Wild Cardの前方一致する結果を確認します
curl localhost -H 'Host:www.example.co.jp'
1 www.example.*
正規表現のはじめに一致する結果を確認します
curl localhost -H 'Host:host2.example.co.jp'
1 ~^.*\.example\..*
curl localhost -H 'Host:host2.example.com'
1 ~^(www2|host2).*\.example\.com
7. location directive (10min)
ラボで使用するファイルをコピーします
cp ~/f5j-nginx-plus-lab1-conf/lab/multi-location.conf /etc/nginx/conf.d/default.conf
設定内容を確認し、反映します
cat ~/f5j-nginx-plus-lab1-conf/lab/multi-location.conf
 1 server {
 2    listen 80;
 3    location / {
 4       return 200 "LOCATION: / , URI: $request_uri, PORT: $server_port\n";
 5    }
 6    location ~* \.(php|html)$ {
 7       return 200 "LOCATION: ~* \.(php|html), URI: $request_uri, PORT: $server_port\n";
 8    }
 9    location ^~ /app1 {
10       return 200 "LOCATION: ^~ /app1, URI: $request_uri, PORT: $server_port\n";
11    }
12    location ~* /app1/.*\.(php|html)$ {
13       return 200 "LOCATION: ~* /app1/.*\.(php|html), URI: $request_uri, PORT: $server_port\n";
14    }
15    location = /app1/index.php {
16            return 200 "LOCATION: = /app1/index.php, URI: $request_uri, PORT: $server_port\n";
17    }
18    location  /app2 {
19       return 200 "LOCATION: /app2, URI: $request_uri, PORT: $server_port\n";
20    }
21    location ~* /app2/.*\.(php|html)$ {
22       return 200 "LOCATION: ~* /app2/.*\.(php|html), URI: $request_uri, PORT: $server_port\n";
23    }
24
25 }
設定を反映します。
nginx -s reload
locationの処理順序は以下となります。
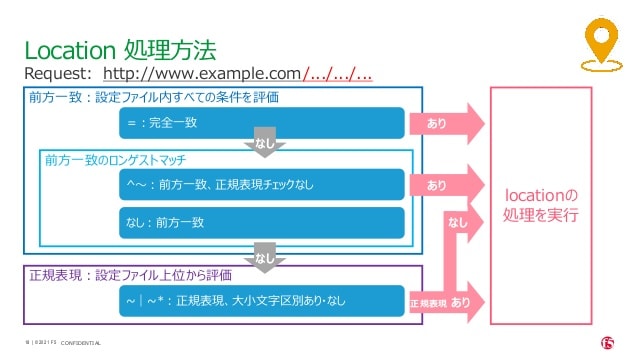
期待した結果となることを確認してください
前方一致する結果を確認
curl http://localhost/app1/index.html
1 LOCATION: ^~ /app1, URI: /app1/index.html, PORT: 80
正規表現で一致する結果を確認
curl http://localhost/app2/index.html
1 LOCATION: ~* \.(php|html), URI: /app2/index.html, PORT: 80
8. Proxy (5min)
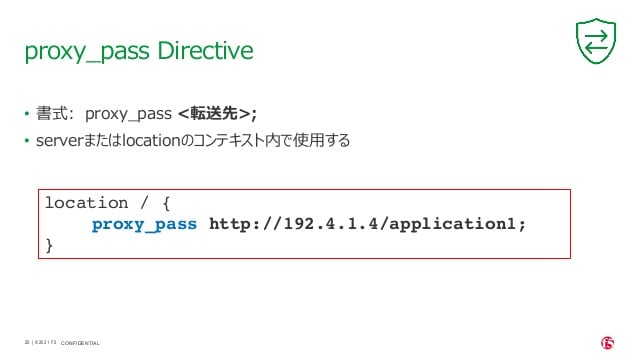
ラボで使用するファイルをコピーします
cp ~/f5j-nginx-plus-lab1-conf/lab/proxy.conf /etc/nginx/conf.d/default.conf
設定内容を確認し、反映します
cat ~/f5j-nginx-plus-lab1-conf/lab/proxy.conf
1 server {
2 listen 80;
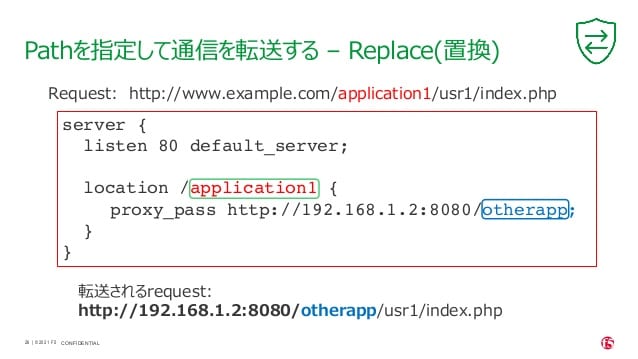
3 location /app1 {
4 proxy_pass http://backend1:81/otherapp;
5 }
6 location /app2 {
7 proxy_pass http://backend1:81;
8 }
9
10 }
設定を反映します
nginx -s reload
以下のコマンドを実行し結果を確認します。 どのような処理が行われているか確認してください。
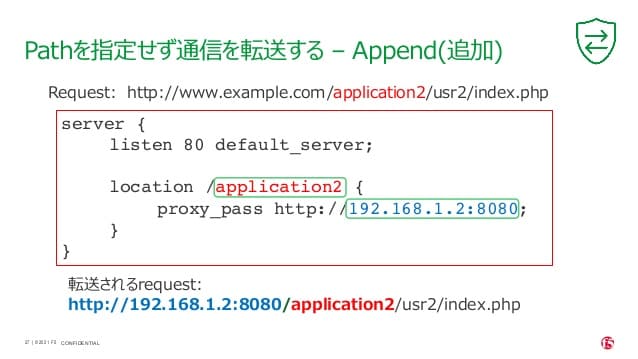
curl -s localhost/app1/usr1/index.php | jq .
1 {
2   "request_uri": "/otherapp/usr1/index.php",
3   "server_addr": "10.1.1.8",
4   "server_port": "81"
5 }
curl -s localhost/app2/usr1/index.php | jq .
1 {
2   "request_uri": "/app2/usr1/index.php",
3   "server_addr": "10.1.1.8",
4   "server_port": "81"
5 }
9. Load Balancing (5min)
ラボで使用するファイルをコピーします
cp ~/f5j-nginx-plus-lab1-conf/lab/lb-weight.conf /etc/nginx/conf.d/default.conf
cp ~/f5j-nginx-plus-lab1-conf/lab/lb-weight_plus_api.conf /etc/nginx/conf.d/plus_api.conf
設定内容を確認し、反映します
cat ~/f5j-nginx-plus-lab1-conf/lab/lb-weight.conf
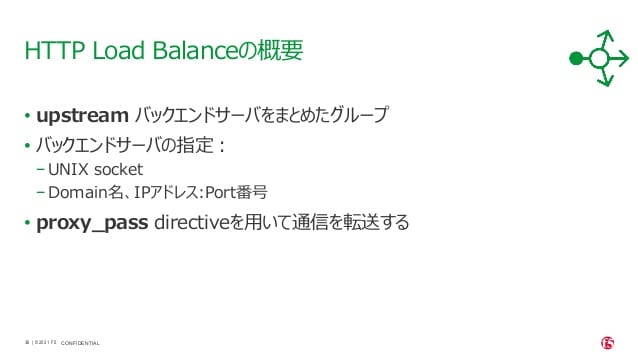
 1 upstream server_group {
 2     zone backend 64k;
 3     server backend1:81 weight=1;
 4     server backend2:82 weight=2;
 5 }
 6 server {
 7     listen 80;
 8     location / {
 9         proxy_pass http://server_group;
10     }
11 }
Note
API、APIを活用したDashboardの機能は NGINX Plus の機能となります。 NGINX OSS では利用できません。
cat ~/f5j-nginx-plus-lab1-conf/lab/lb-weight_plus_api.conf
 1 server {
 2     listen 8888;
 3     access_log /var/log/nginx/mng_access.log;
 4
 5     location /api {
 6         api write=on;
 7         # directives limiting access to the API
 8     }
 9
10     location = /dashboard.html {
11         root   /usr/share/nginx/html;
12     }
13
14 }
設定を反映します
nginx -s reload
作業を行うホストからブラウザでNGINX Plus Dashboardを開く場合、 ``ubuntu01``の接続はメニューより ``PLUS DASHBOARD``をクリックしてください。 踏み台ホストから接続する場合、ブラウザで http://10.1.1.7:8888/dashboard.html を開いてください
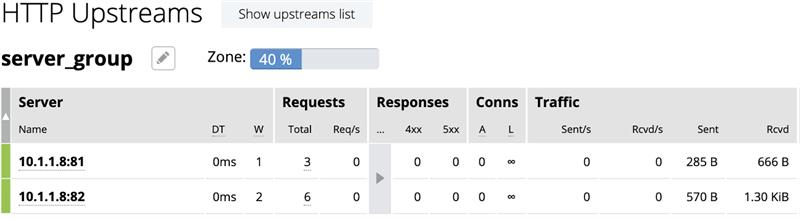
以下コマンドを実行し、適切に分散されることを確認します。
for i in {1..9}; do echo "==$i==" ; curl -s localhost | jq . ; sleep 1 ; done
 1 ==1==
 2 {
 3   "request_uri": "/",
 4   "server_addr": "10.1.1.8",
 5   "server_port": "82"
 6 }
 7 ※省略※
 8 ==9==
 9 {
10   "request_uri": "/",
11   "server_addr": "10.1.1.8",
12   "server_port": "82"
13 }
Dashboardの結果が適切なweightで分散されていることを確認してください。
10. トラフィックの暗号化 (5min)
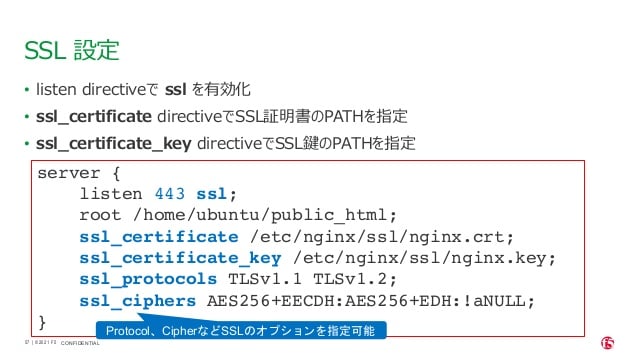
ラボで使用するファイルをコピーします
cp -r ~/f5j-nginx-plus-lab1-conf/ssl /etc/nginx/conf.d
cp ~/f5j-nginx-plus-lab1-conf/lab/ssl.conf /etc/nginx/conf.d/default.conf
設定内容を確認し、反映します
cat ~/f5j-nginx-plus-lab1-conf/lab/ssl.conf
1 server {
2     listen 80;
3         listen 443 ssl;
4         ssl_certificate_key conf.d/ssl/nginx-ecc-p256.key;
5         ssl_certificate conf.d/ssl/nginx-ecc-p256.pem;
6         location / {
7                 proxy_pass http://backend1:81;
8         }
9 }
設定を反映します
nginx -s reload
以下のコマンドを実行し結果を確認します。
HTTPでのアクセスを確認
curl -v http://localhost
 1 *   Trying 127.0.0.1:80...
 2 * TCP_NODELAY set
 3 * Connected to localhost (127.0.0.1) port 80 (#0)
 4 > GET / HTTP/1.1
 5 > Host: localhost
 6 > User-Agent: curl/7.68.0
 7 > Accept: */*
 8 >
 9 * Mark bundle as not supporting multiuse
10 < HTTP/1.1 200 OK
11 < Server: nginx/1.21.3
12 < Date: Mon, 22 Nov 2021 15:05:35 GMT
13 < Content-Type: application/octet-stream
14 < Content-Length: 65
15 < Connection: keep-alive
16 <
17 * Connection #0 to host localhost left intact
18 { "request_uri": "/","server_addr":"10.1.1.8","server_port":"81"}
HTTPSでのアクセスを確認
curl -kv https://localhost
 1 *   Trying 127.0.0.1:443...
 2 * TCP_NODELAY set
 3 * Connected to localhost (127.0.0.1) port 443 (#0)
 4 * ALPN, offering h2
 5 * ALPN, offering http/1.1
 6 * successfully set certificate verify locations:
 7 *   CAfile: /etc/ssl/certs/ca-certificates.crt
 8   CApath: /etc/ssl/certs
 9 * TLSv1.3 (OUT), TLS handshake, Client hello (1):
10 * TLSv1.3 (IN), TLS handshake, Server hello (2):
11 * TLSv1.2 (IN), TLS handshake, Certificate (11):
12 * TLSv1.2 (IN), TLS handshake, Server key exchange (12):
13 * TLSv1.2 (IN), TLS handshake, Server finished (14):
14 * TLSv1.2 (OUT), TLS handshake, Client key exchange (16):
15 * TLSv1.2 (OUT), TLS change cipher, Change cipher spec (1):
16 * TLSv1.2 (OUT), TLS handshake, Finished (20):
17 * TLSv1.2 (IN), TLS handshake, Finished (20):
18 * SSL connection using TLSv1.2 / ECDHE-ECDSA-AES256-GCM-SHA384
19 * ALPN, server accepted to use http/1.1
20 * Server certificate:
21 *  subject: CN=localhost
22 *  start date: Mar 24 01:04:24 2021 GMT
23 *  expire date: Apr 23 01:04:24 2021 GMT
24 *  issuer: CN=localhost
25 *  SSL certificate verify result: self signed certificate (18), continuing anyway.
26 > GET / HTTP/1.1
27 > Host: localhost
28 > User-Agent: curl/7.68.0
29 > Accept: */*
30 >
31 * Mark bundle as not supporting multiuse
32 < HTTP/1.1 200 OK
33 < Server: nginx/1.21.3
34 < Date: Mon, 22 Nov 2021 15:05:49 GMT
35 < Content-Type: application/octet-stream
36 < Content-Length: 65
37 < Connection: keep-alive
38 <
39 * Connection #0 to host localhost left intact
40 { "request_uri": "/","server_addr":"10.1.1.8","server_port":"81"}